The new Beta version of Premiere Pro presents some facelifts regarding export and import tasks, making them more user-friendly and with simplified GUI (Graphical User Interface). Although these are small changes, ADOBE guarantees that this is just the beginning of making Premiere Pro much more fast, efficient, and…simple, with a special emphasis on UI.
The goal: Making Premiere Pro more efficient
The ADOBE press release which was sent to journalists was titled “Radically improve the end-to-end experience for the future of video creation”. “This refresh is more than just a facelift, it’s the first step in a longer journey,” says ADOBE. “Our design and engineering teams are working in lock-step to implement purposeful, thoughtful change. We continually and passionately discuss the functionality and intention behind each iteration to ensure we don’t just simplify things for the sake of doing so, but rather create new and improved workflows to enhance the editing process”. In this statement, we can explore ADOBE’s intentions, making its flagship NLE much more like a Final Cut Pro. That means, mainly improving the GUI (Graphical User Interface) so the users (=editors) can focus more on the cut than on complex windows and preferences.
This refresh is more than just a facelift, it’s the first step in a longer journey.
ADOBE
Focusing on the essential
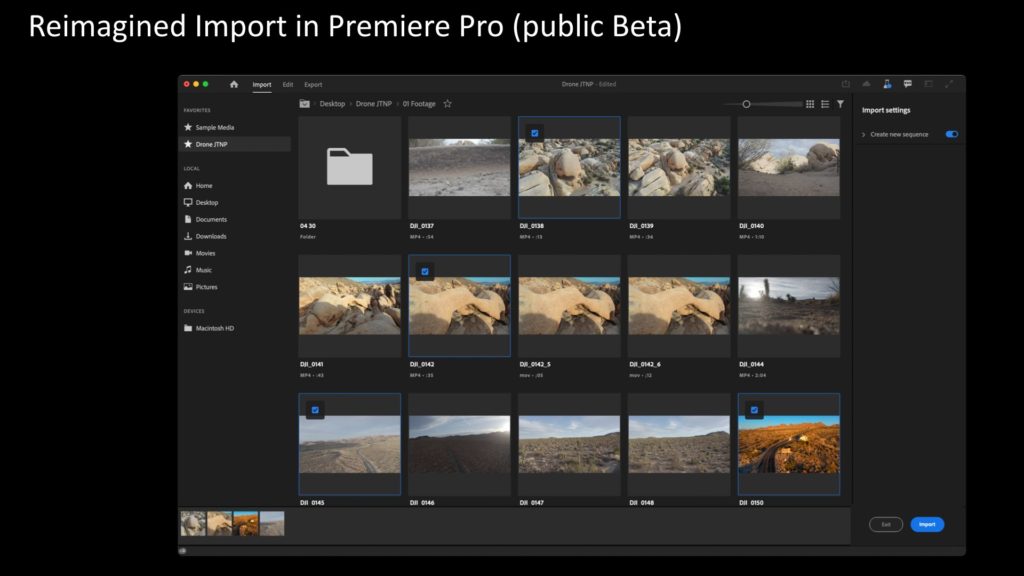
As stated by ADOBE: “The new Import Mode, for example, is now a streamlined, media-first experience that focuses on what social video creators and editors need to do first — access their content quickly and easily…We removed the need to read through complex and confusing settings dialogs like New Project and New Sequence. This produces a clear path for creators to start new projects, while also providing a better workflow for experienced editors by allowing them to import media from multiple file paths, a functionality we’ll be adding to the public Beta, such as the ability to preview clips from separate essence files stored in camera folder structures., and favorite folders”. Also, a new header bat was introduced, to seamlessly integrate the core phases in the editing process. ADOBE says that this header bar will be a universal design element across the Creative Cloud applications to support the import/export process and provide more consistency and familiarity as users orient themselves within different tools. Let’s unveil the main changes. Note that all these changes are in Beta (for now).
We’re looking holistically at the entire editing experience so that we can build a framework to address the needs of today and anticipate the possibilities of tomorrow…We’re excited to introduce this first step in our new vision for Premiere Pro with more to come this year.
ADOBE
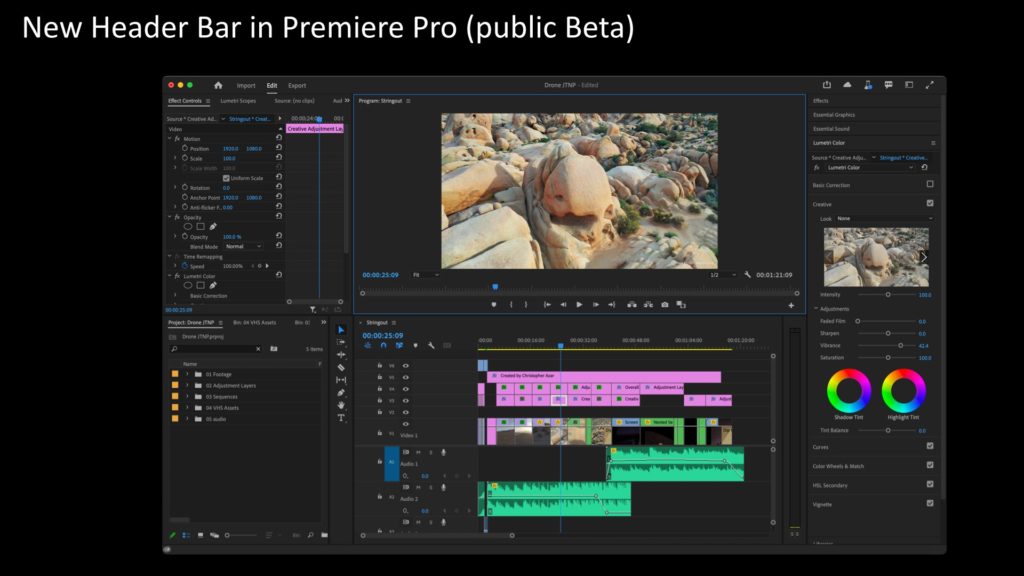
New header bar: Navigate easily
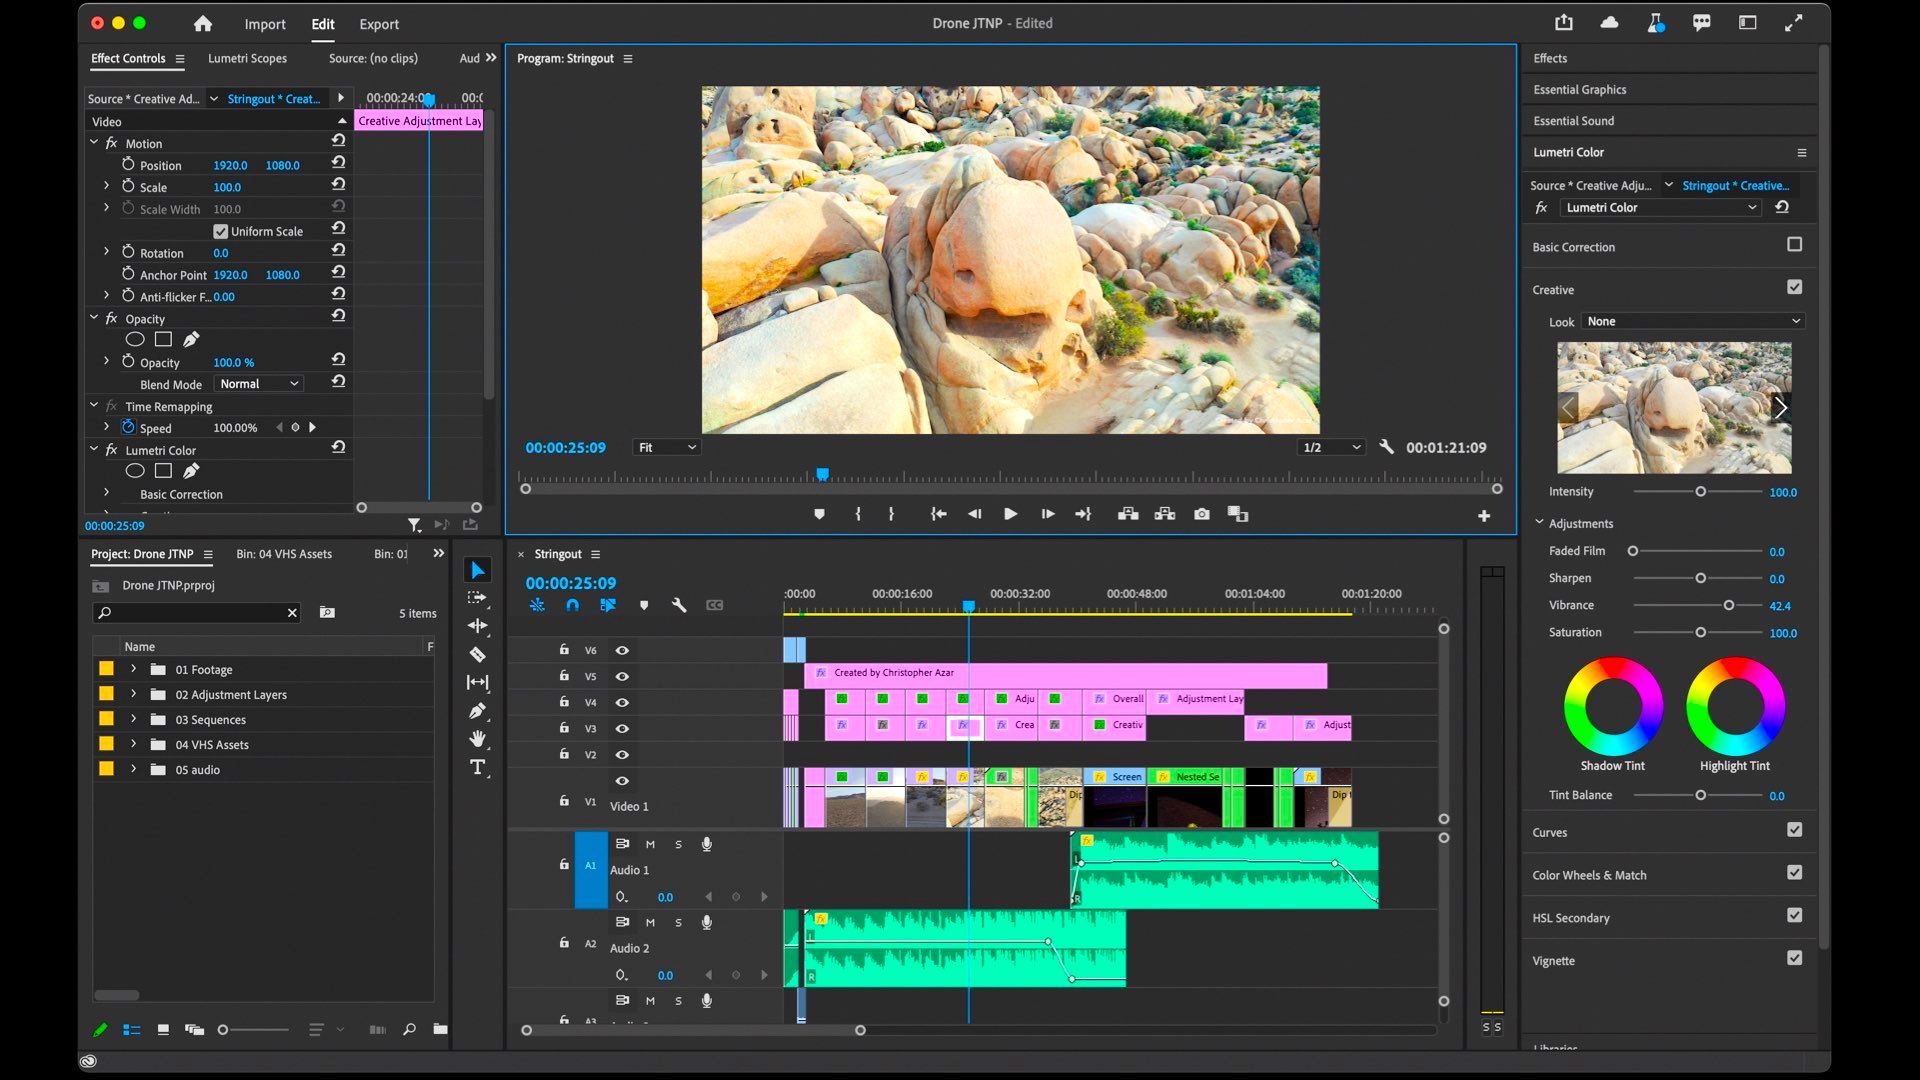
The new header bar provides centralized navigation within Premiere Pro (Beta), connecting the core phases in the editing process: Import, Edit, and Export. The current project name is displayed in the center of the header bar. In the Edit mode, task-specific editing workspaces are accessible via a dropdown as well as Quick Export, System Compatibility Report, what’s new in the latest build, and a link for providing feedback on the Beta. The new header bar will be a common design element across the Creative Cloud applications to help users orient themselves more easily within different creative workflows.

New import workflow
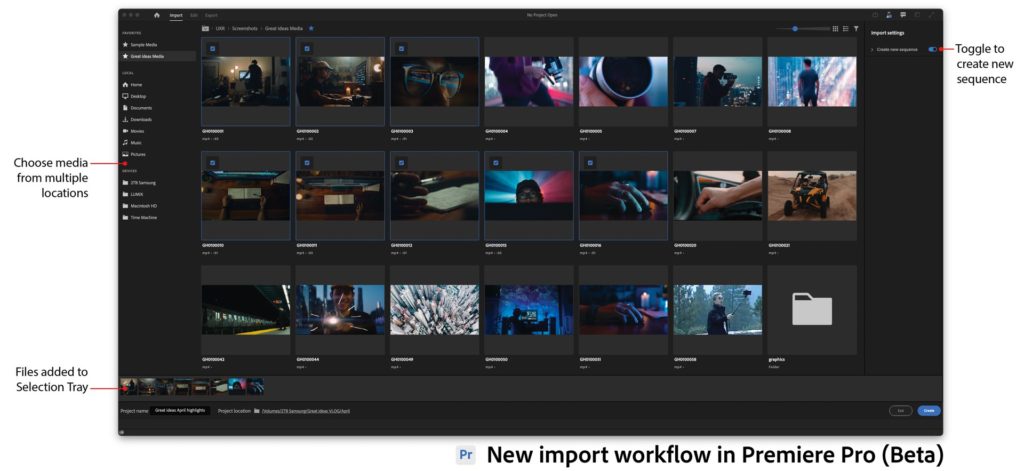
The new import experience in Premiere Pro (Beta) is more visual and focused on your media rather than your project settings. You can now visit multiple locations and select media from them. The workflow can be customized to your needs, but the overriding objective is to help you get your media onto the timeline faster.
Create a New Project
- In Premiere Pro (Beta) home screen, click New Project to open the Import mode. In the left-hand column, navigate to your media storage location.
- Select the storage location. Your media is presented on the Import desktop. The import workflow moves from left to right: Start by navigating to your media storage location. Your media opens on the Import desktop, where you can select the clips and other assets, such as audio and graphics, which you want to use. Hover scrub over individual clips to review them.
- Select video clips and other media assets to add to your project. As you choose your media, the assets are collected in the Selection Tray at the bottom of the window. Premiere Pro chooses the optimal project settings based on the media you have selected. For locations, you use frequently, click the star next to a storage location to add it to your favorites.
- At the bottom of the window, give your project a name and select a location for your project file.
Import options
With Create New Sequence toggled on, when you click Create, the media in the tray is added directly to a new timeline, in the order they were selected. This is great for shorter projects and you can start editing right away. If you toggle Create New Sequence off, a new project is created with the selected assets. In this case, you can add them to the timeline manually from the Project panel. Depending on your workflow, this may be more suitable for longer projects with lots of assets. Sequence settings: With the new import workflow, Premiere Pro (Beta) chooses the sequence settings, such as resolution and frame rate, based on the media in your project.
New export workflow
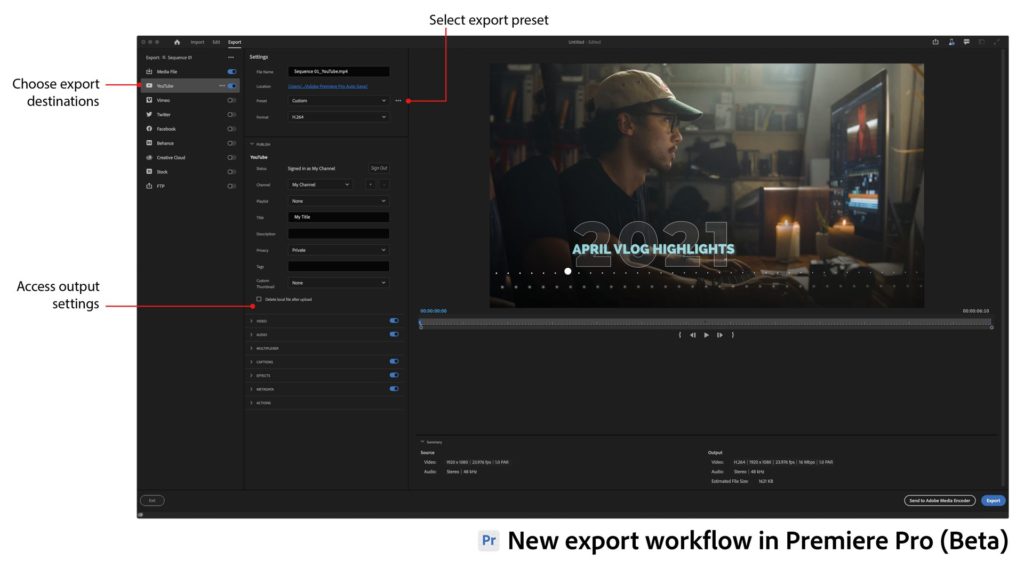
The new export workflow streamlines the process of delivering completed videos by focusing on the destinations of the content. Optimized render settings for popular social platforms like YouTube, Facebook, and Twitter are presented. Advanced settings are easily accessed for customizing exports.
Exporting video projects
- Select the sequence you want to export.
- Choose Export from the new header bar at the top of Premiere Pro (Beta) to open the new Export workspace. The export workflow moves from left to right. Start by selecting a destination for your video from the choices in the left-hand column, such as YouTube, Vimeo, or your local drive (Media File). Premiere Pro (Beta) presents optimized export settings based on your destination.
- Accept the default settings or open the dropdown menus to access advanced export options to customize your output.
- Click Export

Final thoughts
As ADOBE mentioned, this is just the beginning. “We’re looking holistically at the entire editing experience so that we can build a framework to address the needs of today and anticipate the possibilities of tomorrow,” ADOBE says, and adds that: “We’re excited to introduce this first step in our new vision for Premiere Pro with more to come this year.” So between the lines, we will be expecting more UI and usability improvements on the next versions. As a final statement, ADOBE emphasizes that: “We’ll be rolling out these new experiences on a timeline starting with public Beta to ensure that our customers can provide feedback, explore the changes and continue to use Premiere Pro to its fullest potential. These changes are additive and not a replacement to current workflows We understand how big of a role muscle-memory plays and we don’t want to disrupt your flow in any way”.
What do you think about those changes? Does it indicate a new era of Premiere Pro? Does it mean the software will become more user-friendly? Throw your thoughts in the comments section below.
Product list
Here’re the products mentioned in the article, and the links to purchase them from authorized dealers.
- Adobe Premiere Pro CC (1-Year Subscription, Download)

